Localizing 'Papers, Please' - Part 1

Papers, Please was released on August 8th, 2013 without multilingual support. Even though it would’ve been great to support other languages besides English, I decided to push that work until after the game’s initial release. This massive post will go over my process for localizing the game.
Before writing this post I knew it would be long, but not this long. It’s too big for the TIGForums devlog where it belongs. Instead of breaking it up into multiple forum posts, I created this blog for hosting. It came as no surprise that tumblr also can’t handle a single post of this size.
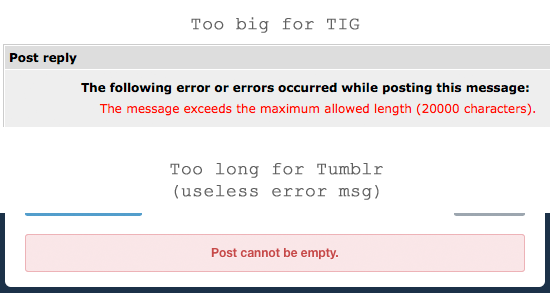
Undeterred and unwilling to move again to wordpress or something, I’ve broken this post into two parts. Most of the information in Part 1 is pretty technical. Skip to Part 2 for a less technical topics. Anyways, let’s get started.
Why Not Localize From The Start?
Couple reasons.
Not sure it’d be worth it.
There were some requests for localized versions of the beta, and I had a general idea that I may want to eventually localize it. But it would’ve been a lot of work without knowing for sure that it was worth the signifcant time, effort, and money investment.
No time to set up a good system for it.
This is a common theme for me. I work alone and among all the stuff I had to do to finish the game, “localize it” was near the bottom. Along with setting up the game to accept localizations, I’d also need to coordinate with others to do the actual translations. In the end, that process took 4 months so in retrospect I’m glad I didn’t try to fit that into the initial release.
Limiting to a single language is much easier during development.
Papers, Please is full of documents with precise layouts and an obscene number of different, tiny, pixel fonts. When creating things for the first time, the ability to iterate quickly in Photoshop on a single image/document was great. There would’ve been a lot of wasted work if localization-friendly assets had to be generated each time I changed something early on. Waiting until the game was completely done made everything easier.
Haxe/OpenFL somewhat discourages separation of code and data.
One tricky aspect of using Haxe/OpenFL to make the game is that updating a data file takes just as long as updating the source code. The build tools recompile the assets and code at the same time so the common incentive to keep data out of the code in order to improve iteration didn’t really apply. This makes rapid prototyping really easy but sets you up in a slightly bad way for later production.
Token Considerations
So for the initial release I’d resolved to ignore localization. But I’ve worked on localized games before and I had some basic understanding about the things I’d need to make Papers, Please localizable. These were a few small things I squeezed into the initial release:
Some displayed text was split out from the code and moved into the data.
Haxe has a nice feature where you can reference a specially-formatted xml file from a class definition to have it pull text from the data. These identifiers are helpfully validated at compile time; if you mistype something, you’ll get an error message right away.
Limited the use of text as much as possible.
This sounds laughable considering how much text is in the game, but there were plenty of cases where I decided to replace some planned text with an icon or to remove it entirely.
Used sane document layouts.
Anything is possible with Photoshop, but I kept the general parameters of what a localized version of the game would need in my mind as much as possible. That basically meant reducing the amount of distorted, rotated, variably-colored, or very-tightly-fit text.
After The Initial Release
The game came out in August and I spent the next month or so fixing bugs. After that I took a short break and the requests for localizations started piling up. Fan translations appeared and at that point I felt it was time to refactor and restructure the game to support thorough and easily-created localizations.
What Needs To Be Localized?
The first step when localizing a game is to figure out exactly what needs to be changed for a non-English version. The ultimate goal is to allow any string in the game to be replaced. Where are the strings?
Images
All images were authored in Photoshop and any text was just placed by hand using simple paragraph alignment and wrapping features. Documents were built up this way with markers (lone black pixels) for variable, game-set text.
Data
Plenty of XML and other data files contained displayable strings. Instead of using a reference id which pointed to a translations file, I just typed in the English strings directly.
Code
We’ve all done it.

How To Localize It?
Each case is handled differently. Working from the complete English version makes this process much clearer since the problem is well defined.
Images
This was by far the most difficult case. I’ll talk about it in detail below with the localization tool. Teaser:

Data
As mentioned above, a common way to localize strings in data is to not put the strings directly in. Instead, you put a reference id which points to a global database of strings. Then you can just swap out the database for a new language and all the strings pointed to by the references change at once. The game already had Text.xml, so technically I already had this kind of support in place. I’d just need to move every single display string in every single data file into Text.xml and replace it with the reference identifier.
Unfortunately, Papers, Please has a lot of data files covering all kinds of different textual data. I decided right away that this technique wouldn’t work well for me. I’m the kind of person that prefers straightforward and clear over almost anything else when it comes to assets and code. Swapping out all the perfectly readable strings with reference ids would both be a lot of work, and severely reduce the readability of every single data file in the game.
So instead of changing the data, I built a system to localize strings during load. In the game, there are now 3 components to localized data files:
- The original data files in English
- A localization database (Loc.csv) that contains context ids and mappings from all English strings to localized strings
- In-code extractors which define how to access/edit the strings in the original data files
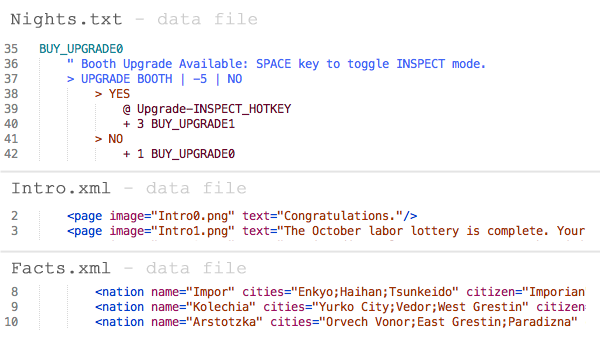
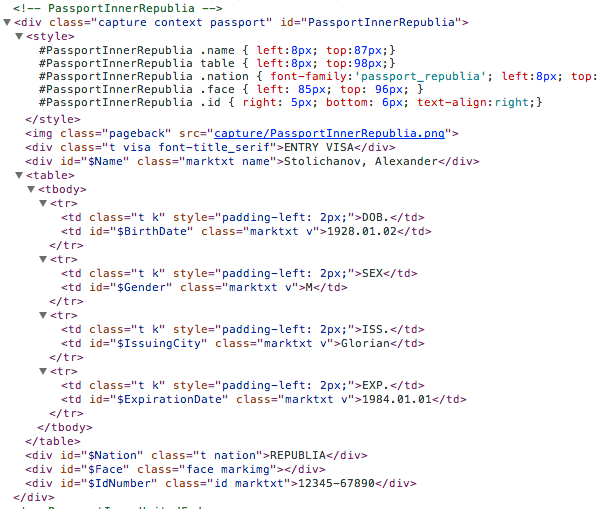
The key step here is #3, the extractors. The game supports three types of structured textual data: XML files, CSV files, and TAB files (a custom tab-indented hierarchical format). For each of these types, I wrote a simple extractor class that edits the already-loaded structure in-place. So, for example, it’s possible to create an XmlExtractor for a particular data file and context:
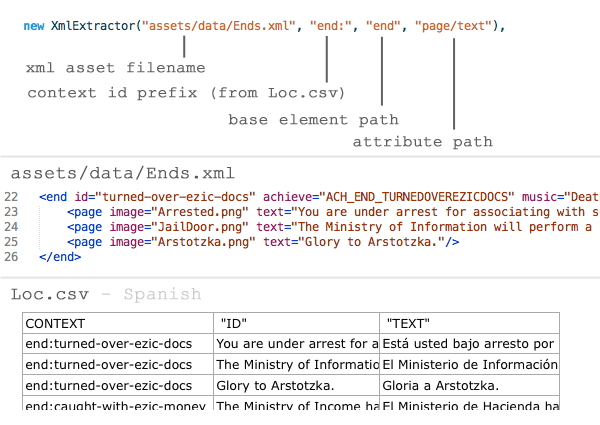
Ok, bear with me here. The XmlExtractor here is built to handle Ends.xml. When the game wants that file, it loads it up into the Xml structure, then uses this extractor to transform the strings. To do that, it first finds all “end” elements (children of the root). For each of those, it builds a context id by combining “end:” with the “id” attribute value of the “end” element -> “end:turned-over-ezic-docs”. It now iterates all child “page” elements and checks their “text” attribute (“pages/text”). These two parts define the context id and the string id.
Now comes the Loc.csv lookup. The context id is compared to the CONTEXT column and the string id is compared to the “ID” column in Loc.csv. (String id values get modified slightly before lookup to work around minor edits: all spaces, symbols, and punctuation are removed). If the extractor finds a match, it modifies the value of the attribute to the “TEXT” column for that row.
Later on, when more specialized structures are built from this loaded Xml instance, they’ll find the localized strings in the attributes. What was once “Glory to Arstotzka” in English is now “Gloria a Arstotzka” in Spanish. Because this transformation happened at such a low level (in the Xml loading routines), the rest of the code doesn’t require any changes.
The extractors for CSV and TAB work in a similar way, by modifying the low-level structures before they’re handled by higher-level code.
There were some tricky considerations to make this work smoothly though. For one, the game’s simple scripting language for generating immigrants uses only the English names for certain things. This required ignoring some strings during the load-transform process and manually translating them for document display only.
This extractor system has the really nice feature of also allowing me to automatically collect all the strings that need to be localized. For a special export process, the game runs through each extractor, loads up the targeted asset file, iterates each element/node/whatever, and spits out the context, id, and English text into a “starter” Loc.csv. That means I could tweak a few things and easily regenerate Loc.csv before the translators got their hands on it.
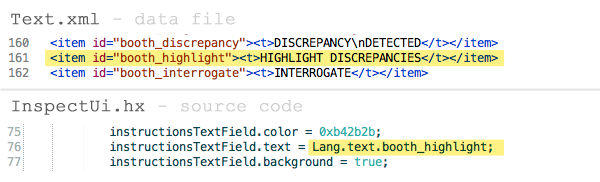
Code
This one was easy. Text.xml was set up and worked well for this purpose so I just had to move the rest of the strings out of the source code and into there.
The Localization Tool (Loc Tool)
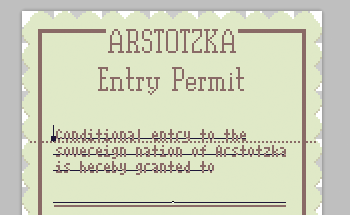
As a refresher, Papers, Please has lots of low-res text-heavy documents that look like this:
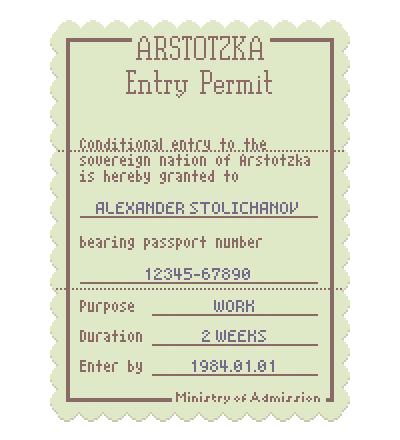
There’s two types of text here:
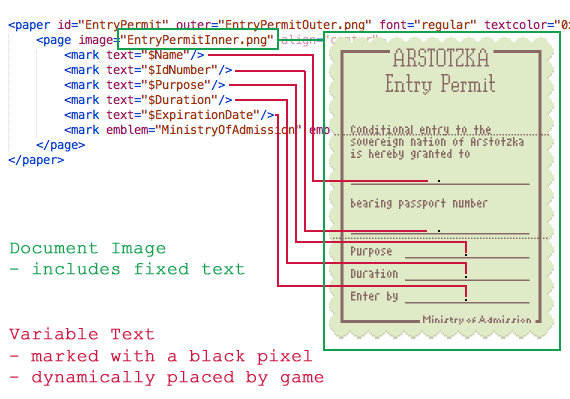
- Fixed text that doesn’t change once the in-game language is selected (ARSTOTZKA, Entry Permit, Conditional entry…, etc). This text is baked into the document image assets and often has a complex layout.
- Variable text that changes for each immigrant in the game (ALEXANDER STOLICHANOV, 12345-67890, WORK, 2 WEEKS, 1984.01.01). This text is placed by the game dynamically and uses only simple alignment and wrapping layout features.
The localization task here is to replace that fixed text for each individual language, generating a new set of document images that are loaded when the game boots up (or the language setting is changed). This was the big challenge for localizing Papers, Please. Each document was lovingly crafted with just the right text and just the right space. All in English. I knew at every moment during development that this would be a huge pain in the ass to localize. I was right.
The desired result:
The easiest solution on my end would be to just hand off all the images to the localizers and let them deal with it. This is probably the most common way of doing image localization. Most fan translation groups have a few graphic artists on the team for this exact purpose.
In this case though, I wanted each language to follow the English version very closely. And I wanted the game to be “easy” to localize. Requiring everyone to make custom edits on all these documents definitely wouldn’t have been easy.
So I decided the best solution was to build a tool that would allow editing any of the fixed text in-place. WYSIWYG. You see the document exactly as it appears in the game, click on any fixed text, type in a new string, and see it instantly update. Then the tool generates baked pngs of each edited document. As a localizer, you’d never have to edit the images directly. I like building GUI tools so this seemed like a fun exercise. At the start.
Layout Features
When setting out to make the localization tool, I had to first define what layout features were needed. If you’ve just got one language to worry about, this is easy and the basic text alignment and wrapping abilities of Photoshop work great. When you need to account for variable-length text and different font sizes, things get much more complicated.
Some examples:
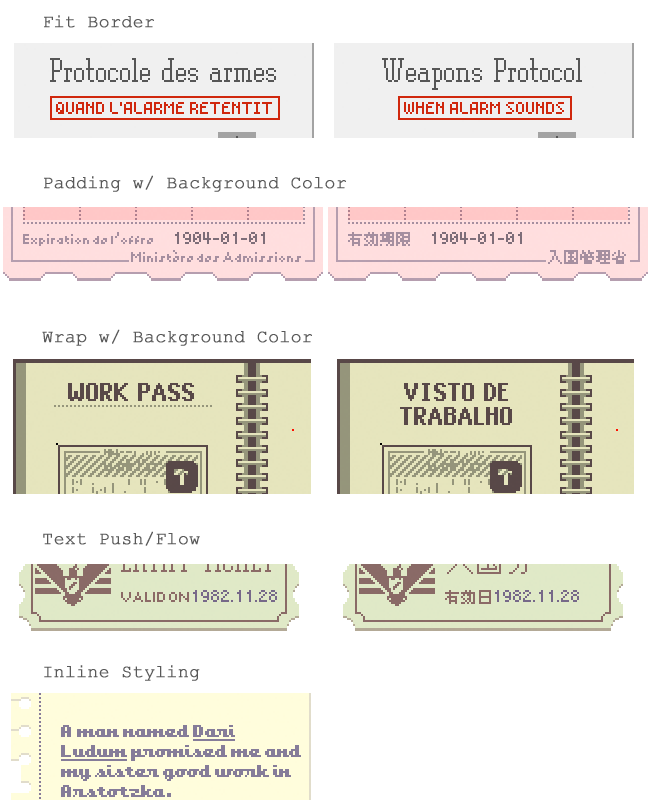
The basic features I needed were: Alignment, Rotation, Inline styling (underline, bold, etc), Layout flow, and Graphic repositioning.
Tool Options
I researched a few different options for making complex, editable document layouts. First I looked at writing a custom tool in Flash. Unfortunately, Flash is a bit of a pain to work with in application form, and their text handling is not great. Another option was C#/WinForms. I really like C# for tools development but it has the same rudimentary text handling problems as Flash. Any kind of dynamic layout support would have to be written by me. Or using some library with its own quirks. I can imagine how many small edge cases and gotchas are involved with that and really wanted to avoid this kind of work.
I also considered going full pro with something like InDesign or Illustrator. There are localization tools for Illustrator but they’re very expensive and very limited. And then everyone that wanted to generate a localization for the game would need these costly tools, which seemed like overkill.
Eventually I settled on an old frenemy, CSS. I have a long history of using CSS but hating every moment of it. All the cool website layout ideas in my head turn out to be a pain to create, and rarely cross-platform compatible. Usually I end up simplifying things to the point where they look boringly basic and yet just barely hold together.
For this project though I had a big advantage: I didn’t care about cross-browser compatibility. I can require a certain browser and reasonably expect that any small quirks in the CSS handling will look ok.
Settled: Web app (HTML5/CSS)
Ok, so I had a tech plan for the loc tool. Now I wanted something to create the CSS-based layouts. I’d convert each document the game needed from a Photoshop doc to a HTML5/CSS div, add that to the loc tool for the localizers to edit, and be done with it.
To help with this, I sampled a few existing WYSIWYG CSS editors. They were all terrible. Beyond terrible. Getting anything laid out precisely was an exercise in ultimate frustration. And assuming something could look half decent in the editor, peeking at the resulting mess of CSS styles and classes was enough to make me rule these editors right out.
I gave up on WYSIWYG and fell back to a trusty text editor. All the document layouts were written by hand. From Photoshop, I saved out the background image of each document. That became the background for each document div which I layered on text and graphic elements using handwritten HTML and CSS.
CSS is painful to write but extremely powerful. All the features I needed were part of the spec. Getting them to work right was often hard, but compared to having to write the implementations myself in Flash or C#, I’ll take that level of “hard” any day.
As more localization texts started rolling in, I periodically made tweaks for longer or shorter elements. The great thing is that all languages use the same exact CSS and all sizing/dynamic features are handled naturally by the browser’s layout engine.
Javascript
Using a webpage for the tool also let me do a lot of cool stuff in Javascript to streamline the editing process. Javascript is mature enough now that you can write proper apps in it. And JQuery makes it even easier still to do document-related manipulations; perfect for this kind of tool. I’m not a huge fan of dynamic languages like JS, but the API is so well suited for this task that it was a great fit.
I won’t go into too much detail about the Javascript code. It’s too technical even for this post and I don’t really know how to organize that well for discussion. You can browse the code yourself at the loc tool GitHub page.
From Tool to Game
The web app approach worked great for layouts, scripting, and editing. Almost everything. The one area where it fell flat was in getting the final document images from the browser in a form that the game could use.

I initially experimented with several different webkit-based page renderers. These are run from the command line and can generate pngs from an entire webpage or a particular div. Since each game doc was in its own div inside the loc tool page, this would’ve been perfect. Unfortunately, there’s a critical limitation of these renderers, and ultimately with the HTML5 standards. Currently, there’s no universal way to render a div to a canvas in HTML5. The only way to get a generic div as an image is to painstakingly duplicate all the layout code in custom javascript and draw all the elements yourself. Thankfully there are existing JS libraries to do this, but then another critical shortcoming rolls up, and this one has no solution. Canvas text-drawing routines have no (working) parameter to disable text smoothing. This meant all the fonts would render as a blurry mess. I played around for a while to get past this with no success.
Eventually I found an alternative. Chrome has an API call to basically screencap the current tab. So to generate images from the doc divs, I wrote a custom Chrome extension to scroll to each div, screencap the tab, and crop out just the div from the resultant entire-tab image. It’s a pretty laborious process that took some tweaking to get right. It also slows down the exporting since there’s a fair bit of capturing+scrolling going on. But it works.
Font Smoothing
Running into the font smoothing problems with the webkit renderers gave me a little taste of what web page rendering thinks of bitmap-based fonts: Not much. Disabling font smoothing to get sharp bitmap-based pixel fonts is surprisingly difficult with CSS. There are CSS specs for disabling font smoothing but (surprise) they’re not reliable. In some browsers it plain doesn’t work. For some, it works ok in OSX but not Windows.
My solution was to get things working best on Chrome in OSX, my native dev enivonment, then implement a simple color quantizer to forcefully remove the anti-aliased pixels generated by font smoothing on Windows. I also have to ensure that ClearType is disabled when doing the Chrome screencaptures on Windows. Even with font smoothing turned off in the most forceful way, Windows will still ClearType bitmap fonts into looking like shit. And on OSX, any system with a retina display has to enable the “Open in Low Resolution” checkbox of Chrome to avoid the mandatory high resolution font anti-aliasing.
And So
After 4 months of work, I had an easy-to-use tool that allows WYSIWYG editing of all the document images in the game.
Non-layout Localization
The CSS worked well for precise document layouts, but there were two other types of text that needed to be localized.
Non-document Text
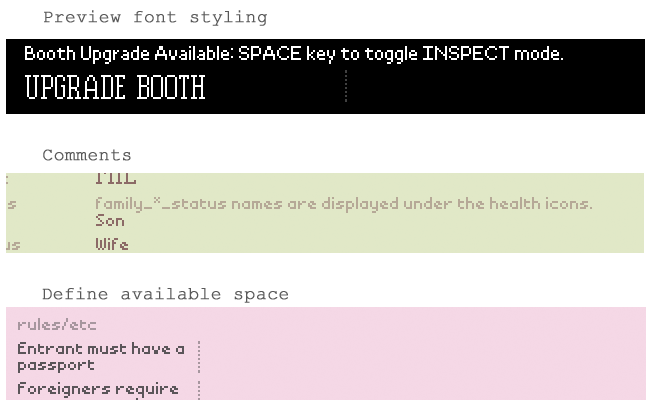
A large portion of the text in the game doesn’t appear in a document. Or it gets inserted into a document at runtime. In order to keep everything in one place, the loc tool also lists all this text for editing. Again, the nice thing about being a HTML5/CSS/Javascript-based web app is that I could apply appropriate styling to make this text appear somewhat as it would in the game. I could also easily add inline comments for certain elements, or define the available space for text elements when used by the game.
Custom Images
Despite all my efforts, there were also some images that just had to be localized by hand in Photoshop. Usually wherever I’d made a bit of hand-drawn, very-precisely-fit, or just bonkers text.
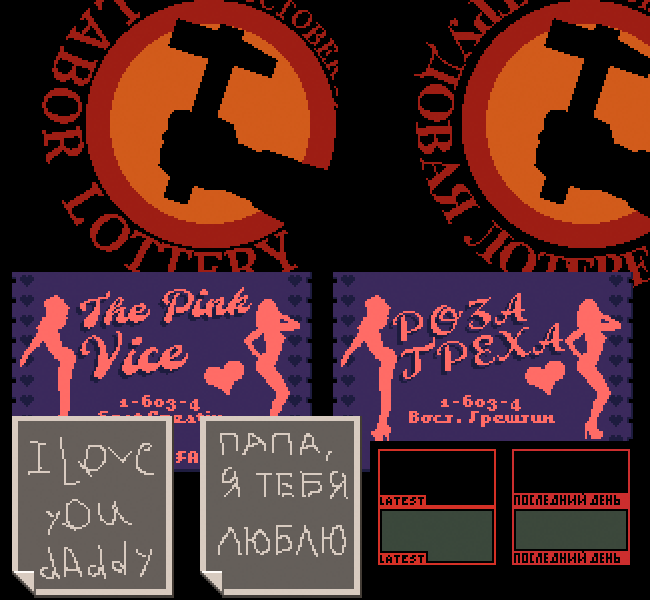
I provided the original PSD files for localizers to edit these custom images in the simplest way. As the loc tool is designed to be comprehensive (everything needed to localize the entire game is there), you can specify these custom images as you would any localized text.
Try It Yourself
The final loc tool is available at paperspleaseloc.github.io for anyone to play around with. It only works accurately in Chrome and may take a minute to load all the fonts for the first time. Browse the source code at the loc tool GitHub page.
Fonts
Going into this whole localization thing I foresaw a particular problem with finding suitable fonts. For the original English build, fonts were easy. I grabbed freeware/opensource ones that fit the look/size that I wanted and threw them in. I think there were 14 different fonts in use in the original version of the game. Almost none of these had anything more than the basic Latin character set. I dreaded trying to find equivalents to all these fonts with accented, cyriliic, and asian characters.
In fact, I knew it wasn’t possible to find drop-in replacement fonts. I made a valiant effort though. Searching for days sometimes. Asked on twitter even. In the end I realized the need to draw the characters myself (matching the existing font style), or merge the non-latin characters from other like-sized fonts.
Here’s where I ran into another problem: There are no good TTF pixel font editors. I needed TTF font files to work with the localization tool. Normally a game would just have a texture sheet with all the necessary characters on them. But I needed full-fledged TTF-format fonts to appear in the web app.
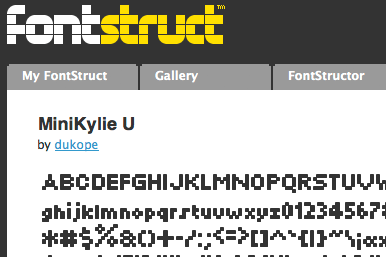
Most TTF font editors cost a ton of money and are optimized for vector-based fonts. The only decent bitmap font editor with TTF export that I could find was fontstruct.com. Unfortunately, fontstruct has no import feature, and I wanted to simply add characters to existing fonts. Damn. After settling on a universal (non-asian) character set, I went through and hand-copied all the existing characters for each font, then drew the missing ones by hand.
As I did this, I gradually reduced the number of fonts in use by the game. Some fonts appeared in only a few places or just didn’t look good in retrospect. Those were dropped, leaving me with 10 font styles.
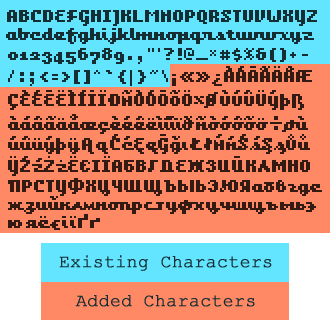
Cyrillic Characters
Adding accented and other extended latin characters was straightforward. Cyrillic characters were a different beast. One of the primary challenges with Papers, Please and fonts is the tiny pixel size of everything. There just aren’t that many ways to draw 8x8 pixel characters and make them legible. This was a particular problem with cyrillic, where I couldn’t find much good reference for such low resolution representations. There are also several characters with letterform variations, so it can be hard to know which one is appropriate in each case. I did my best to impart each font’s style on the new characters while also maintaining legibility. Because I don’t read cyrillic at all, I also made sure to run my letter shapes by native Russian/Ukrainian/etc speakers on twitter. I got some great feedback that led to solid improvements.
Japanese Characters
Things were naturally more complicated when it came time to integrate the Japanese fonts. Japanese doesn’t have a nice brief alphabet and instead uses kanji to represent whole words or parts of words. There’s no way I was going to hand-copy the ~1500 characters for each font. And which fonts would I copy anyways? Kanji is extremely dense. These are not characters that I can draw by myself like with cyrillic. Finding 8x8 Japanese pixel fonts that are remotely legible is a serious challenge on its own.
Eventually after plenty of searching I did find suitable fonts. But as with everything, there was another challenge: most of them were not in a usable format. They were authored many years ago in the Unix-friendly BDF format. This is basically a bitmap font format with no support on Windows or OSX and no known way to reliably convert to TTF, which is what I needed.
Luckily, FontForge (mostly) came to the rescue. FontForge is a massive, old, creaky, X-Windows app for editing fonts. It’s got a really painful UI but tons of features. It’s able to both import BDF fonts and trace them to generate TTF fonts. Easy, right?
Haha.
FontForge’s autotrace feature (which turns bitmap fonts into path-based TTF fonts) is optimized for high resolution curvy fonts. Ugh. With all the parameters and settings you’re given, there’s no way to trace a bitmap font with straight segments to match the pixels exactly. It gets close but breaks down on neighboring interior pixels, leading to little blurry pixels everywhere. To fix this I had to get creative and that’s one of the advantages/curses of knowing how to compile programs from source. I downloaded the autotrace source code and hacked it to shit until it would trace pixel-perfect, right-angle paths everywhere.
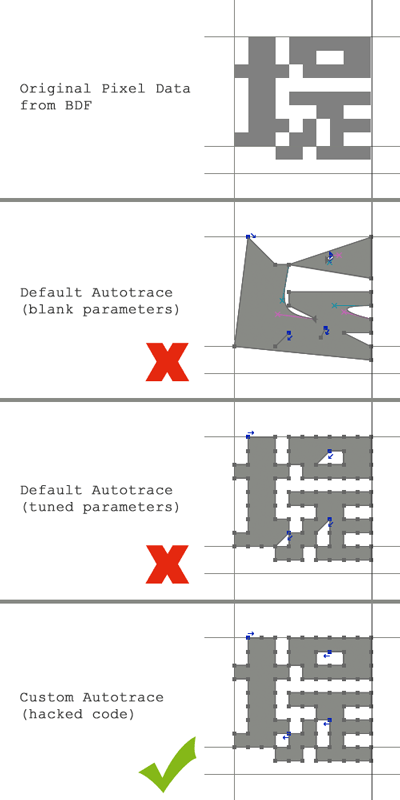
With that sorted I could finally convert the Japanese BDF fonts to TTF fonts, then merge those with my existing expanded font faces in FontForge.
UTF8
UTF8 is great. You can happily code everything against ASCII without a care in the world for the extended character sets necessary for some languages. Then, suddenly, you need to localize your game! Luckily UTF8 has come to the rescue and 90% of the string-handling code you’ve already got doesn’t need any changes at all. Sometimes 100% is good to go, depending on the language you’re using. Haxe is in the 90%, Javascript is 100%. The loc tool worked great with UTF8 from the beginning with no special considerations. Haxe is not unicode-aware, so there was some initial terror from worrying about all the places I’d need to change, and hidden bugs that would go undetected when adding crazy non-ASCII characters to the data sets.
Fortunately, because of the greatness of UTF8, this ended up being less of a problem than I feared. The biggest changes required using a different UTF8-aware iterator/indexer when addressing characters within a string. The localizers themselves were very helpful in letting me know when a string wasn’t wrapping properly, or when a character showed up as gibberish. That was my cue to track down the naive byte-array string indexing and replace it with the UTF8-token version. The game was structured well enough that these kinds of errors caused visual problems but no outright crashes.
Part 2 - Less Technical Stuff
This post was too big for tumblr. Go here for Part 2.